What Should Homeowners Expect During a Roof Replacement?
From preparation to cleanup, a professional roofing contractor ensures the process is smooth, safe, and efficient. Knowing what to expect helps you stay organized, reduce stress, and protect your home.
Replacing a roof is a major investment, and clarity makes the process far less overwhelming. When homeowners understand the key stages, from preparation through final inspection, they can plan ahead, minimize disruptions, and feel confident that their home is protected.
At Skyline Contracting, we know a clear, structured approach ensures the project stays on schedule and delivers long-term value.
Understanding the Roof Replacement Process
Homeowners often underestimate how much planning, labor, and inspection go into replacing a roof. Understanding the roof replacement process is essential for setting realistic expectations about timing, costs, and disruptions.
At Skyline Contracting, we take a professional, step‑by‑step approach to every roof replacement. We start by assessing the existing roof, discussing material options like GAF or CertainTeed shingles, and creating a detailed plan. Our goal is to ensure that you, the homeowner, know exactly what to expect from beginning to end. By walking clients through each stage, we minimize surprises and maximize efficiency.
Knowing the process ahead of time allows homeowners to prepare their homes, anticipate noise and debris, and coordinate schedules. It also helps ensure that the roof is replaced properly, which protects your investment for years to come.
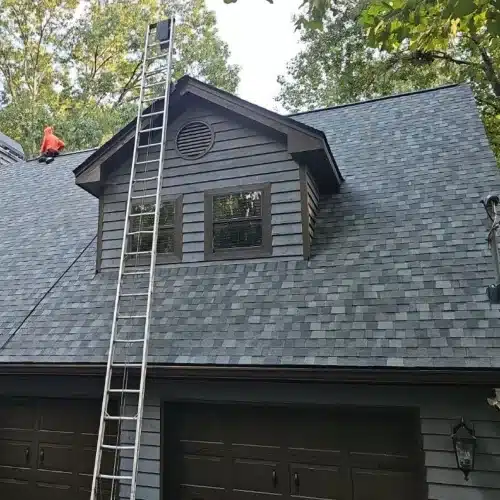
Step 1: Preparing Your Home for Roof Replacement
When roof repair isn’t possible, it’s time for a replacement. Before any shingles are lifted, preparation is key. The first step is clearing your property and creating a safe workspace for the roofing team.
Typical preparation steps include:
- Removing vehicles from driveways
- Covering landscaping, patio furniture, and walkways with protective tarps
- Ensuring pets and children are kept safely away from work areas
Roof replacement involves heavy equipment, ladders, and walking on your roof, which can create noise and minor vibrations throughout your home. While the team works, expect some hammering and occasional nail dropping. To address this, Skyline Contracting implements safety measures, including controlled access to the work zone and protective covering for sensitive areas.
By preparing your home, you reduce the risk of accidental damage and help the roofing crew focus on completing your project efficiently.
Quick checklist:
- Clear the driveway and yard
- Cover landscaping and outdoor furniture
- Secure pets and children
- Review the project timeline with your roofing contractor
Step 2: Tear-Off and Inspection of Roof Decking
The next step is the tear-off process, where old shingles are removed to expose the roof decking beneath. This is a critical stage because it allows the contractor to inspect for damage, rot, or moisture that could compromise the new roof.
Roof decking, usually made of plywood or oriented strand board (OSB), must be in solid condition before new roofing materials are installed. If any sections show water damage or decay, they are replaced to maintain structural integrity.
During tear-off, expect:
- Accumulation of old shingles and nails on the roof surface
- Debris on tarps surrounding your home
- Continuous work from the crew until the roof is cleared
Skyline Contracting ensures thorough inspection of your roof decking. Any compromised areas are documented and repaired immediately, keeping your home safe and your new roof long-lasting.
Quick checklist:
- Ensure personal items in the attic are secure
- Review the tear-off plan and potential decking repairs with your contractor
- Expect visible debris and minor noise
- Understand any additional costs if decking replacement is required
Step 3: Installing Underlayment and New Roofing Materials
Once the old roof is removed and the decking is inspected, the next step is installing the underlayment and shingles. Underlayment is a weatherproofing layer that protects your home from water infiltration, while shingles provide the visible protective and aesthetic surface.
Skyline Contracting works with trusted brands like GAF and CertainTeed to ensure durable, high-quality roofing materials. Installation involves:
- Laying ice and water shields in valleys and roof edges
- Rolling out the underlayment over the roof decking
- Installing shingles in precise, overlapping patterns
- Securing flashing around chimneys, vents, and roof edges
The lifespan of your roof depends on the material you choose. For example, a metal roof can last 40 to 80 years, while asphalt shingles last 20 to 30 years. Professional installation is critical to your roof’s performance. Proper underlayment and shingle placement prevent leaks, extend roof life, and maintain the home’s energy efficiency.
The team checks alignment, nail placement, and adhesion during installation to ensure a perfect finish.
Quick checklist:
- Confirm shingles and underlayment type
- Review product warranties (GAF/CertainTeed)
- Observe installation progress and ask questions
- Verify flashing and roof penetration areas are sealed
Step 4: Cleanup and Final Inspection
After the roof is installed, the final step is cleanup and inspection. This stage ensures your property is returned to its original condition and the new roof meets quality standards.
Skyline Contracting performs:
- Complete debris removal, including shingles, nails, and packaging
- Magnet sweeps of the surrounding property for stray nails
- Detailed final inspections to check for proper shingle placement, flashing installation, and underlayment integrity
At this stage, your roofing warranty is also reviewed, detailing coverage for materials and workmanship. Any homeowner’s questions about maintenance or warranty terms are addressed before the crew leaves.
Cleanup is as important as installation because it protects your property, ensures safety, and provides peace of mind that your home is ready to withstand the elements.
Quick checklist:
- Walk the perimeter for stray debris
- Review the final roof inspection report
- Ask questions about warranty coverage
- Schedule any follow-up maintenance if recommended
FAQ About Roof Replacements in Georgia
How Long Does a Roof Replacement Take?
A typical roof replacement usually takes three to seven days, depending on the size of the home, weather conditions, and complexity of the roof design. Skyline Contracting provides a timeline upfront and keeps homeowners updated throughout the project.
Should I Stay Home During My Roof Replacement?
You don’t need to stay home, but being present can help answer questions and monitor progress. Expect noise and minor disruptions, so plan accordingly. If you have any pets or children, be sure to keep them away from the work area.
What’s Included in a Professional Roof Replacement?
A professional service includes the tear-off of old shingles, inspection and repair of roof decking, installation of underlayment and new shingles, flashing, cleanup, and final inspection. Product and workmanship warranties are also provided.
How Can I Prepare My Home Before Roofers Arrive?
Clear driveways and yards, secure pets and children, and protect landscaping and outdoor furniture. Removing valuables from attics and roof-adjacent rooms is also recommended.
Ready for Your Roof Replacement?
A professional roof replacement is a significant investment in your home. The team at Skyline Contracting in Gainesville, Georgia, makes the process predictable, safe, and efficient. By knowing what to expect during a roof replacement, homeowners can prepare their homes, anticipate timelines, and make confident decisions about materials and design.
Schedule your free consultation today. Whether you’re replacing a worn-out roof or upgrading to premium shingles, Skyline Contracting guides you through every step. Let’s Talk About Your Project and ensure your roof protects your home for decades to come. Contact us online.